Drone Sharper Image App: A Beginner's Guide to Sharper Shots
Learn how to use a drone sharper image app to sharpen aerial photos with a practical, beginner-friendly workflow, including tips and safety reminders for new pilots.

With a drone sharper image app, you can transform blurred aerial shots into crisp, detailed photos. This guide shows how to select a suitable app, capture files optimized for sharpening, and apply step-by-step edits that preserve natural look and color. By the end, you'll know how to integrate sharpening into your recurring drone photography workflow.
Why sharpening matters for drone photos
Sharpening is a key step in post-processing that helps reveal texture in foliage, building edges, and distant landscape details. For beginners we recommend treating sharpening as a final polish rather than a primary fix, especially for images captured with entry-level drones where noise can be more visible. The goal of using a drone sharper image app is to enhance detail without introducing halos, oversaturation, or unnatural contrast. According to Beginner Drone Guide, sharpening works best when you start from high-quality source files, preferably RAW, and maintain realistic edge enhancement that mirrors what your eye would perceive in person. This approach keeps your aerial photos crisp while preserving color accuracy and natural depth.
In practice, sharpening should emphasize edges, not textures or noise. Subtle adjustments often yield the most believable results, especially for skies, water, and architectural lines. As you gain experience, you can tailor sharpening strength to different subjects—stronger on architectural features and softer on skies to avoid an unrealistic look. Using a drone sharper image app with a sensible workflow helps you keep control and build consistent results over time.
What a drone sharper image app can do for you
A drone sharper image app typically offers a focused toolkit for improving perceived sharpness: global sharpen, local sharpening masks, edge-aware controls, and often a preview that lets you compare before/after. Many apps support RAW files and batch processing, which is a huge time-saver for multi-shot projects like real estate shoots or landscapes. The best apps also provide masking to protect skin tones and sky gradients, and features to adjust radius, amount, and detail without spiking noise. This is particularly important because drone photos can exaggerate noise in the shadows and sky if sharpening is over-applied.
Beyond sharpening, these apps commonly include ancillary adjustments such as contrast, clarity, dehazing, and subtle noise reduction. When used wisely, sharpening can make a photo feel crisper and closer to what you saw through the drone’s lens. As you explore the drone sharper image app landscape, prioritize tools that give you local control and non-destructive edits so you can revert to the original image at any time. For beginners, starting with a gentle global sharpen and then adding targeted local sharpening is a safe, repeatable approach.
How to evaluate and choose the right app
Choosing the right drone sharper image app hinges on a few practical criteria. First, ensure RAW support and non-destructive editing so you can preserve the original data. Second, look for masking capabilities that let you protect skies or smooth areas while enhancing edges elsewhere. Third, consider the app's batch-processing options if you work on large drone photo sets. A clean user interface and accessible presets can speed up your learning curve. Finally, check compatibility with your device (mobile, tablet, or desktop) and whether the app can integrate with your existing workflow, such as exporting to cloud storage or pairing with another editor. When evaluating, test with a few typical drone scenes—urban, rural, and skies—to see how the sharpening behaves across textures and tones, and avoid aggressive presets that create halos around edges. The right choice will feel intuitive and give predictable results across different lighting conditions.
RAW vs JPEG and why it matters for sharpening
RAW files preserve more tonal and color information than JPEGs, which means sharpening can be more precise and controlled. With RAW, you’ll have more latitude to adjust edge contrast, masking, and radii without amplifying noise as quickly. JPEGs compress detail and often carry pre-applied sharpening, leaving less room for improvement. For beginners, the best practice is to shoot RAW whenever possible and keep JPEG as a fallback for quick previews or social media. If you must work with JPEG, apply conservative sharpening and rely on masks to protect areas that should remain soft, like skies and skin tones. This approach helps you maintain natural textures and reduces the risk of oversharpening artifacts in your final image.
Step-by-step workflow with a sharpening app
This section outlines a practical workflow tailored for beginners using a drone sharper image app. Start by importing RAW files into the app, then apply a light global sharpen to establish a base. Next, use masking to constrain sharpening to edges while protecting flat areas like skies. Adjust the radius to balance edge width with detail preservation. Preview before/after to ensure edges look natural and avoid halos. Fine-tune with local contrast or clarity controls to enhance texture without exaggerating noise. Finally, export in a suitable format and resolution for your needs, keeping a non-destructive original in your archive. Over time, you’ll develop a preferred preset set for different subject types—landscapes, architecture, and movement—so your results stay consistent while staying true to the scene.
Masking, local contrast, and avoiding halo effects
Masking is the secret weapon in sharpening workflows. Apply sharpening globally with restraint, then add a mask to reduce or remove sharpening from areas where halos are likely, such as bright skies or uniform walls. Local contrast adjustments can help separate edges without boosting noise. When you’re masking, start with a soft brush at a low opacity and build up where needed. Avoid aggressive, uniform sharpening across the entire image; instead, target edges with precision. If halos appear, dial back the amount and refine the edge radius and masking strength. With careful masking, you’ll preserve dynamic range and maintain a natural look across your drone photos.
Real-world examples: before and after
Consider a mid-urban drone shot of a skyline at golden hour. Global sharpening alone might exaggerate the glass windows or highlight noise in the shadows. By applying a targeted mask to the buildings and slightly reducing noise in the sky, you achieve a cleaner, crisper result that still reads as a natural photo. In another example, a rural landscape with a winding road benefits from moderate sharpening along the road edges to guide the viewer’s eye, while the sky remains soft and gradient-rich. The drone sharper image app shines when you can visually compare before/after and adjust based on the scene’s needs rather than relying on a one-size-fits-all preset.
Common mistakes and how to prevent them
The most common pitfall is over-sharpening, which creates halos, noise amplification, and unnatural textures. Always check the effect on the most detailed areas first and back off if halos appear around edges. Another mistake is sharpening too late in the process; perform sharpening after you’ve completed other edits for color and exposure to avoid compounding issues. Finally, avoid relying solely on automatic presets; devote a few minutes to refine masks and local adjustments for each shot. As you practice, you’ll learn to recognize the telltale signs of overdoing it and keep your drone sharp images looking crisp yet natural.
Alternatives: built-in camera sharpening vs apps
Many drones include basic sharpening options in-camera, often as a trade-off between processing power and image quality. In many cases, the camera’s sharpening is optimized for JPEG outputs, which can limit post-processing flexibility. A dedicated drone sharper image app complements the built-in controls by offering non-destructive edits, masking, and granular controls that you can tune after capture. For most beginners, a hybrid approach works well: shoot RAW, review in-camera sharpening as a quick preview, then run sharpening in the app during post-processing for precise control. This strategy helps you maximize detail without compromising color or texture.
Quick-start checklist
- Shoot RAW whenever possible and keep JPEG as a backup.
- Choose a drone sharper image app with masking and non-destructive edits.
- Import, apply a gentle global sharpen, then create an edge mask for targeted areas.
- Preview changes in before/after mode and adjust radius, amount, and detail.
- Export a high-quality version for archiving and a smaller version for sharing.
- Save your favorite presets and document your workflow for consistency.
Tools & Materials
- Drone with RAW-capable camera(Prefer models that shoot RAW to maximize sharpening flexibility)
- Smartphone/tablet or computer(Used to run the drone sharper image app and manage files)
- A reputable drone sharper image app(Look for masking, non-destructive edits, and RAW support)
- Takeoff/landing and flight footage(Organize shots by scene to streamline editing)
- External storage or cloud backup(Back up RAW originals before editing)
Steps
Estimated time: 45-60 minutes
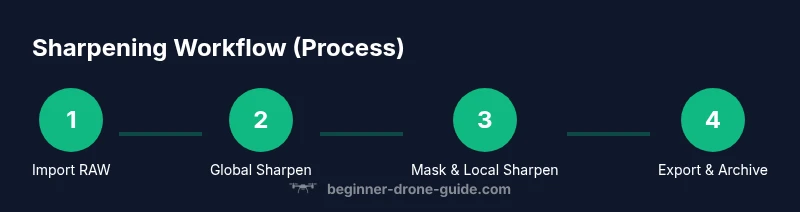
- 1
Import RAW files into app
Transfer your RAW files from the SD card or device, then open them in the sharpening app. This establishes a non-destructive workflow so you can revert edits if needed.
Tip: Organize files by capture date and scene to simplify batch edits. - 2
Apply a gentle global sharpen
Set a light global sharpen to create a baseline. Avoid aggressive values that exaggerate noise or halos.
Tip: Use a low radius (1-1.5 px) for most drone shots to preserve texture. - 3
Mask edges and critical details
Create a mask to protect skies, skin tones, and flat areas. Sharpen only the edges that define structure—build gradually.
Tip: Paint mask with low opacity and widen only where detail matters. - 4
Fine-tune radius, amount, and detail
Adjust the sharpening controls to balance edge clarity with noise control. Preview on a few representative regions.
Tip: If halos occur, reduce radius or sharpening amount slightly. - 5
Check color and exposure after sharpening
Ensure color fidelity and exposure aren’t compromised by sharpening. Tweak contrast or brightness if needed.
Tip: Sharpening can cause perceived contrast increases; adjust globally if needed. - 6
Compare before/after and reset if needed
Toggle the before/after view to confirm the improvement is natural. If not, revisit the mask and radius.
Tip: Keep a copy of the original to compare progress across edits. - 7
Export the final version
Export in high resolution for print or online platforms; save a smaller version for quick sharing.
Tip: Use a lossless or high-quality JPEG/PNG depending on your destination. - 8
Archive and document your workflow
Save the project alongside the original RAWs. Document settings for repeatable results.
Tip: Create a template with your preferred settings for future projects.
Frequently Asked Questions
What is sharpening in drone photo editing?
Sharpening enhances edge contrast to make details appear crisper. It should be applied carefully to avoid halos and noise, especially on drone images with variable textures.
Sharpening boosts edge clarity. Use masking to focus on edges and avoid halos or noise, especially in drone photos.
Do I need a drone sharper image app if my camera is sharp?
A sharpening app offers more precise local control and non-destructive edits than in-camera sharpening. It’s especially helpful for batch processing and fine-tuning edge detail.
A sharpening app gives you precise, non-destructive control and helps you fine-tune edge detail across multiple shots.
Should I sharpen RAW or JPEG?
RAW provides more latitude for sharpening, with less risk of artifacts. If shooting JPEG, apply sharpening conservatively and use masking to limit impact.
RAW is best for sharpening, but if you shoot JPEG, be cautious and mask to avoid artifacts.
Can sharpening cause halos?
Yes, halos can appear if sharpening is too intense or radius is too large. Use masking and test on a few areas before committing to the whole image.
Halos can show up if you sharpen too strongly; mask and test to avoid this.
Is there a risk to over-sharpening in drone photos?
Over-sharpening can introduce noise and artifacts. Always compare with the original and keep sharpening subtle, especially for skies.
Over-sharpening risks artifacts; keep settings subtle and compare with the original.
What about other post-processing steps after sharpening?
Yes—combine sharpening with noise reduction, color grading, and tone adjustments for a balanced final look. Don’t let one step dominate the entire edit.
Combine sharpening with noise reduction and color grading for a balanced final photo.
Watch Video
Quick Summary
- Start from RAW for best sharpening results
- Mask to control where sharpening applies
- Preview, then adjust to prevent halos
- Use a non-destructive workflow for repeatability
- Document your settings for consistency